I have this lovely little Satsuki at the moment. It belongs to Bertie, one of our club members who exhibited it at our recent exhibition. I have it until he returns from holiday. I couldn’t resist a photo in flower.


I have this lovely little Satsuki at the moment. It belongs to Bertie, one of our club members who exhibited it at our recent exhibition. I have it until he returns from holiday. I couldn’t resist a photo in flower.
One of my purchases in America was a new lens for my camera, Sigma 70-300mm. I haven’t had a lot of time to play with it but took it out into the garden yesterday for 10 minutes to see what the macro function was like on it. I took a few random shots of foliage and anything else that would sit long enough. Here’s the results.


Well, I had great fun yesterday spending the day with a few mates working and talking about trees.
I started off on my own and made a start at defining the deadwood/live vein on my Rigeda juniper. This is as far as I got got before Stan arrived.


Stan brought his Chinese Juniper for some styling work. This is it before.

 We started working outside in the sun.
 Stan had to be given a special pass to be allowed into my garden wearing a Man Ure shirt! This was Stan’s first proper go at wiring and, he’s either a natural, or I’m an amazing teacher!! More than likely the former 🙂
We had to move inside as our usual Northern Ireland climate kicked in.
 He even cleans up after himself which is a rarity in my garage.
 This is the tree at the end of the day. To pull it further into shape it would have required further fine detailed wiring, but I felt that this was sufficient for the day. We discussed the addition of a shari in the future and another possible front.


 Here’s the before and after side by side.


Stephen brought down his two satsuki for thinning and structural work. These hadn’t been touched in years and were in dire need of a major haircut.
We started on this one. It has had a hard life! A few years ago it lost the whole apex and had been left to regrow. This year a stray plank of wood being waved around by a careless workman broke another branch near the apex. (Sorry Phil couldn’t resist 🙂 )
Many of the problems can’t be addressed today as further growth is required. We hope that after this pruning, vigorous growth will allow for a redesign of the apex and a new potting angle to compensate.

Stephen at work, hiding behind the tree. It’s only a shohin 🙂

Pad before and after thinning.


and after work today.

We ran out of time with the other satsuki. We only managed to get the rest of the flowers removed and one branch partially thinned.


Another visitor to my garage was Michael, who has just joined the club. He’s been doing bonsai for roughly 12 years and had contacted me asking for advice about a few trees that had suffered over the Winter.
I think he enjoyed a walk around my garden and I popped over to his house with Phil that evening for a look at his trees. More of that in another post.
He brought with him a Juniper that had been previously styled by a few of Europe’s big names. It had suffered due to the Winter and a poor choice of potting mix. He was quick to see the benefits of a more open mix that he had previously been taught to use. In fact may of his trees had issues with mix choice.
This is Michael having a chat with Phil about Juniper growth and the techniques used to improve his collection.
 Michael also had a problem with the deadwood at the base of his Juniper rotting. We introduced him to a few new products to stop this and helped him get the rotted wood removed down to savable harder wood.
 During all this Phil was busy taking cutting from the two satsuki azaleas and a Cork Bark Elm.


 That’s all we got done for the day. I’ll post some photos from Phil and I visiting Michaels garden later.
I had to pick up my Sister and Nephews from the Airport this afternoon, flying in from Australia. As the flight was delayed slightly, I had time to pop into Stephen’s house on the way to have a look at a few trees. Living 5 minutes from the airport is handy 🙂
His Satsuki has just started on the downhill stretch after flowering. Still worth a few photos though.


A nice hosta accent about to flower.

Big Hornbeam.

Big Larch.

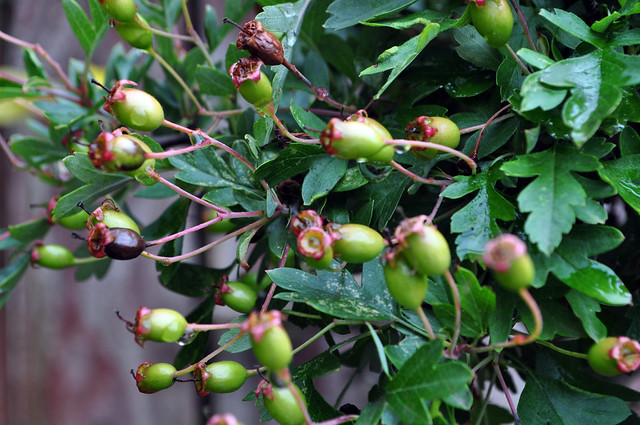
Haws on a Hawthorn.
 and I spotted this clump of baby spiders on a Pine just waiting for a breeze to drift off on.

As it was nearing the end of flowering I decided to remove the flowers on this Satsuki now. It’s easy to see the seed heads while they are still attached to the flowers!
This is it in flower.
 You can see how to remove flower heads HERE.
This was the tree this afternoon sans flowers.
 I got this tree last year on the cheap as it was nearly without branches and very pot bound. It was repotted this Spring and today I shortens some of the extension growth produced at the end of last year. All I’m after is large platforms to display flowers, typical of satsuki everywhere. However, I do want to build up the ramification in the proper manner, not just fill it out with leggy growth. Here is a photo of it after some shortening of the shoots. I even managed to get a few cuttings 🙂
 I am now expecting some serious growth.
My Satsuki is nearing the end of it’s flowering period and will soon need to have all the flowers removed. I have already completed this task this year with my Rhododendron, this can be viewed on an older post.
Lee, who commented on that post, was asking for clarification on what I meant by removing the seed pod. Here is a step by step through the process.
Here’s a typical flower on my satsuki.It’s getting a but tatty looking and will soon fall.
 This only means that the flower petals will fall. Left behind is usually the ovary and the stigma. Below you can see the same flower bud with the petals removed and the other bits, also including the stamen, remaining.
 This is the part that must be removed to avoid the tree wasting energy in producing seed. This can be picked out with fingernails but it is best to remove with scissors as shown below by cutting through the pedicel or stock behind the pod.


This is the removed seed head. If you get it early, it is still small and a lighter colour.
 Below is a typical sight on my satsuki at the moment. The petal has fallen and the pod with style and stigma is all that remains. Notice it is bigger than the one above already and is a slightly darker colour. Energy is being wasted.
 Hope this helps explain the process. I’ll maybe add this as a permanent page on the blog somewhere for future reference.

Any Satsuki geeks out there who know the actual variety of this one. It has White/Light Pink, Light Pink with Dark Pink linear variegation and dark pink flowers.
White Flower

Light Pink Flower

Light Pink with Linear Variegation

Dark Pink Flower

Leaf Size

By way of update for the above post, here is the Satsuki in flower now. It looks like the apex is dark pink with the rest of the tree light pink.

 Haven’t a clue what variety it is, perhaps ‘Wishinu’ 🙂
Today I went to my mate Stephen’s house to take a few record photos of his trees. Here’s a few that looked particularly nice. A big thank you to Stephen who donated a few trees to my son Matthew who is showing an interest in bonsai. If you are reading this Jamie, between Stephen and myself, there’s a few trees in this for you too 🙂


This was the set up for the photos.
 And this is where I talked Stephen into posing with his Deshojo for scale purposes. You would think he’d look happier with a tree like that beside him 🙂


Shop for quality bonsai
bonsai and garden
The Kaizen Bonsai Blog
Teaching, Learning, Enjoying Bonsai
The ramblings of an old artist and someone who would like to grow better bonsais trees
my bonsai
My wood creations
Hand Crafted Furniture
Creativity Through Bonsai
dirt leaves flowers
bonsaï | vidéo | Japon - ActuBonsaï
Japan's aesthetic, craftsmanship and spirit
Bonsai with a hint of madness...
"Tibolar-RS. your soil needs it, your plants will love it"
