
Back in March 2010 I decided that this collected Hawthorn needed to be reduced to one trunk line. It is now well established in the training pot and had produced strong growth. It seems a shame to just cut off the second trunk which had some nice bark and movement. I promised myself this year that I would try and exercise more patience when working with my trees and always look for the longer term benefits. No more quick fixes. I therefore made the decision to air layer off the surplus trunk.
On a sunny afternoon in March Philip Stephen and I set about getting the tree layered.
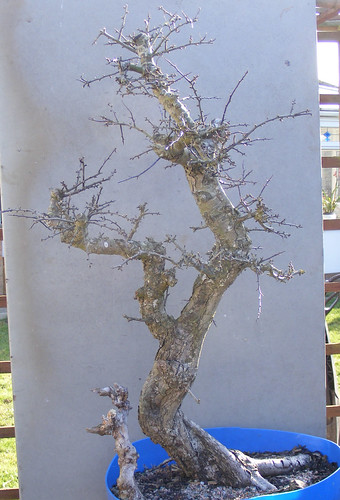
Below is the tree before starting the process.
 Next step was to remove some of the smaller branches that were getting in the way.
 Next we mark out the area of bark to be stripped away. This was done with a marker so adjustments could be made.
 Next we strip away the area marked out. You need a sharp knife at hand and some time was taken to ensure all the cambium layer was removed. This involves scrapping the heartwood to get rid of any dregs remaining. Time is also taken to ensure that the top edge is clean with no ragged bits. This is important as a callus must form first before roots will grow. A callus will struggle to form well on a rough edge with damaged cells. A sharp knife is essential here.
 Now the area is prepared, we apply sphagnum moss around the selected area. Some people will use rooting hormone at this point but I personally find little difference. If it’s going to root, it will! An extra set of hands at this point is a big help. Here we use cling film to hold the moss in place. If you over do the cling film, you will make it harder to see roots appearing in the weeks and months ahead. It’s easy to get carried away!
 Once we have this done, a strip of old pond liner is used to cover up the cling film. This does a few things. It allows me to remove and check on root growth during the year. It keeps the area free of any late frost and helps keep an even temperature inside. Roots only in cling film will turn away from the light.

During the Summer I ensure that I water the area making sure the moss doesn’t dry out. I also turn the tree to keep all areas exposed to direct sunlight. Checking the cling film every week or so I can see that it appears to be working.
Fast Forward to October and you can see below that the tree has grown well during the Summer. Longer shoots have been trimmed as required. As often happens when air layering, the trunk has issued new shoots below the layer on very old wood. This is an added bonus for bonsai if a lower branch is required.
If I had checked and found no roots I would have covered it up again and left it until Spring. If Spring came around and there was still no roots I had two options. Cut it off and carry on with the original plan of one tree or, re-trim the top edge and reapply the moss and go again.
 The pond liner is removed and we await the moment of truth.
 Roots can clearly be seen through the cling film. Happy Days
 ![]()
 I am confident that there will be enough to support the layered tree so I leave the cling film in place and cut the layer off. By leaving the film I ensure no damage will be caused to any fragile roots.
 The layer is removed and you would think I would look happier about it. Scowl much?
 This is what remains and I can begin work on this during the Winter. Areas of deadwood will need to be created to disguise the cut point. You can clearly see the new strong shoots at the base in this photo.
 Philip has joined me again for the removal and he suggests that the layer may also work as a cascade in the future.
 I already have my mix made up ready for the potting of the layer. It’s horticultural grit and biosorb (cat litter)
 The cling film is carefully removed and roots can clearly be seen in the sphagnum moss.
 Here’s a close up of some of the roots.

The moss is left in place and the layer is potted into a sturdy plant pot. To remove the moss now, would likely cause more damage to fragile roots. Much better to leave it until the next repotting in a few years. The layer was placed into my poly tunnel to give a few extra weeks of warmer temperatures and give extra protection over the Winter. I have tried 6 layers this year and all but one was a viable layer. The failure was, most likely, down to my lack of watering. This is a fantastic way of increasing your stock of bonsai raw material and one everyone should be trying out for themselves. This isn’t the only way to layer, nor is it necessarily the best way to layer, but it is the way I do it! I’ll keep you posted with how this new hawthorn progresses this year. I checked the tree last weekend 13/2/11 and noticed some nice buds swelling on the layered tree. I plan to repot the parent into a better and smaller pot within the month.
April 2011
Here’s the parent plant repotted and the strong budding on the layer. Flowers are pretty too. 🙂


Thanks for the step by step coverage. I appreciate the clear visuals and commentary along the way. Great job of documentation…you’re one of the few that demonstrates so well.
LikeLike
Cheers John and thanks for taking the time to comment.
LikeLike
How many people say that hawthorn do not be air-layered. We see it not the case. I will try too. Thanks for the photo and hope to see the little crataegus become a beautiful and true bonsai.
LikeLike
In Ireland we have an abundance of hawthorn, mostly hedges but some pockets of quality yamadori can be found too. I find Hawthorn one of the easiest species to layer, so there is great potential out there for free quality material.
Thanks for reading, love your blog, I have added you to my favourites list.
Regards
Ian
LikeLike
Thank you for sharing your works.
LikeLike
I cant believe the detail in your air layering,I am very new in bonsai ,but this gives me a bit of a boost to try it sooner than later.I am collecting material on the subject and will use your information as a guide. Thank you. Karth.
LikeLike
Pingback: Air Layering to Create Bonsai - Your Bonsai Tree
Thanks for the demo John, I am thinking of air layering a few of my mature hawthorn trees in my garden for bonsai, would it be to late in the season to do it now.???
LikeLike
Hi there – great article and just had a couple of questions if I may?
Weekly watering of the air layering- do you use a syringe or undo the top and spray from above and how much water as I found it difficult to assess in the bag and…..
Have you tried a Paul’s Scarlett and did you have success? I am practising on a Hornbeam whilst a garden centre grafted Paul’s Scarlett establishes. I took more time and got better results with the Hornbeam last year and so am checking if I got my technique right this year with a much bigger layer this Spring. I will move onto the Hawthorn next year so would welcome any additional pointers or experience in that variety of you have any. Many thanks Mark
LikeLike
Hi Mark, I just water from the top when watering as normal. I try and keep it a little lose at the top. I pierce a hole at the bottom to allow excess water to drain. I’ve had no luck with Paul’s Scarlet.
LikeLike