

This is an Escallonia collected from my garden back in 2001. It had previously been growing in another garden unchecked for 50+ years. I collected it along with about 10 others that I gave away to club members over the years. This one I put into my own garden as I didn’t know what to do with it at the time being brand new to bonsai.

Cutting back for a closer look

Yep, it’ll do, cut back further

Trenched for ease of collecting

Out at last, not easy, it was well rooted!

Cut back and into it’s training box

New buds appeared within weeks
What made me think of using an Escallonia for bonsai? Answer: This tree displayed by Mr Oakton at Gingko Award 2001. When I saw it in the show I couldn’t wait to get back home to get this one out of the ground!

John Oakton’s beautiful Escallonia
I let the tree have a period of free growth and then did a little branch selection. Peter Snart of Willowbog Bonsai was over for a visit and he helped with some of the initial carving work which I refined the following year.

One of the angles

another angle

Roots exposed for repotting in November 2002

Into a better pot and front selected
I posted a few photos of the tree on the IBC for comment and possible virtuals. I did a few myself and was pleased with the results. Here are a few I did and a few from IBC members.

Virtual one

This one was close to the current image

Luis Fontanills from the IBC made a few changes to my virtual
By September 2003 the tree had grown rapidly. I allowed the apex free growth at help with the taper of the trunk line at that point. Marco Invernizzi was over for a workshop and he gave me some guidance with the future of the tree and helped define the live veins. The tree has 3 veins spread around the trunk.

Growing strongly

Further refinement in September ’03. Very late flowering that year!! Possibly a second flush.
I disappeared from bonsai for a few years. Work, family commitments and health reasons kept me from doing any real work on my trees. Water and the odd trim was all they received. This means that I don’t have many photos of this period. The next few photos are from 2009 when I managed to dig the camera out.

Filling out and ready for another trim in 2009

After a trim

February 2010, fresh lime Sulphur, with a 50p for scale

Free growth allowed to try and get those flowers budding

Flowers in June 2010

Apex

A closer look at the deadwood and live veins

Live veins x 3

June 2010

deadwood
I decided to repot in the Autumn/Winter as I was troubled by some of the rotting deadwood. I wanted to inspect this and treat asap as leaving to Spring could result in further rotting.
I had been considering a change of angle as the front to improve the tree. The forward facing branch was bothering me.

November 2010
When I checked the deadwood I found two areas that needed attention. Part of the trunk was hollow and one area of deadwood was going soft with rot. These where treated with wood hardener. On removing the tree from the old pot I wasn’t surprised to see the amount of fine root. The tree had been particularly to water this year as the density of roots wouldn’t let the water penetrate.

Plenty of strong roots showing that the tree is in good health
I was able to remove a lot of the root which assisted with treating the deadwood.

Root base after cleaning with a hose
I had asked Peter Snart from Willowbog Bonsai to look out for a nice pot for the tree. He knew the tree well and selected a pot that he had been keeping for himself. It’s an oval with a reddish glaze from Walsall Ceramics.

Trying the new pot out for size
After much consideration about changing the front I opted to tilt the tree more to the right and remove the forward facing branch. This was trimmed back with a view to removing it in the Spring.

Decision made and tree repotted

This area now needs some work to make it more interesting and to get rid of those dead roots.
May 2012
I had been looking at the tree since Spring bud break and knew that some work was needed. I only planned to give it a trim and leave the work to another time. But one thing led to another and before I knew it I had the wire out.
I wanted to lower some of the heavy branches and fill in some of the large gaps within the canopy. This was it before I started.

By using a few guy lines here and there and a little trimming, I finished with this.


October 2012

November 2012, some efforts to help preserve the deadwood on the tree. A little additional carving and a clear out underneath the tree so that the three live veins act like a tripod keeping the deadwood raised above the soil. Wood treated with wood hardener to preserve what was left.


And then a final coat of lime sulphur for the tree. From now on the deadwood will be left to fade and give a more natural look.

April 2013 now to start building up some decent ramification.
January 2014 Ramification has improved.

May 2015

September 2015 – starting to prep the tree for exhibition at Bonsai Europa. I had a stand made for the tree by a friend.


and then prepping the tree. Mossing the soil surface…

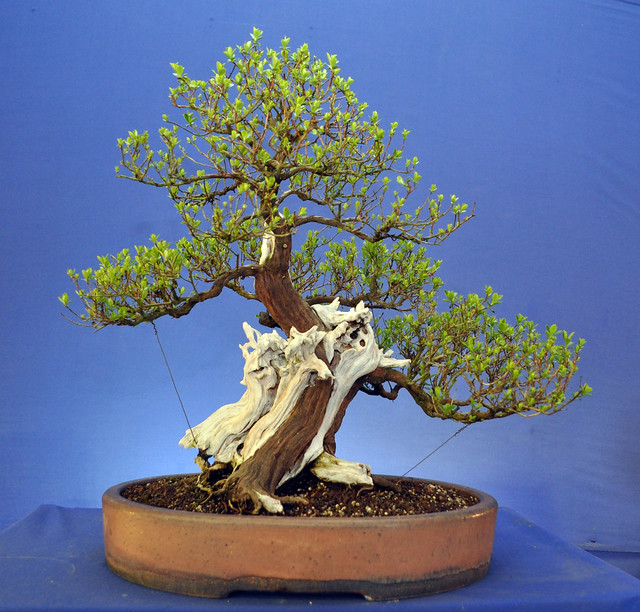
Live veins oiled about 2 weeks before the show to give a darker colour.


Not an ideal time of the year to exhibit an Escallonia but worth the effort. Seen here ready for the road to Manchester and Bonsai Europa.

Getting the official photo before staging.


And how it looked on the display stand.
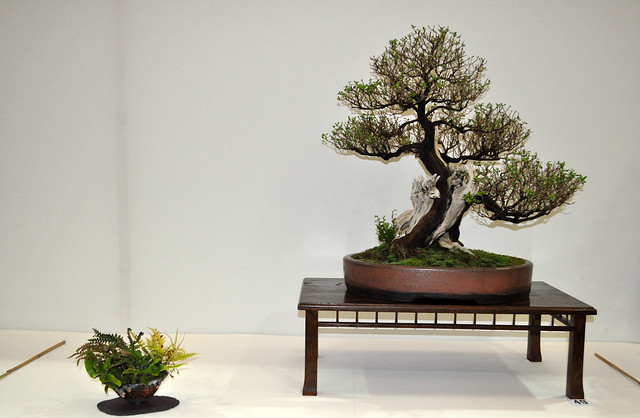
Chuffed to have a tree exhibited at a show of such a high standard.

And the official photo. A long road but worth all the effort.

Now to find a new pot….

Looks great.
Interesting to see how the tree has evolved over a period of time. Looking forward to seeing it’s progress over the coming year.
LikeLike
Thanks Ryan. I’m amazed that I got this far with the blog in a few hours. It’s easier than the club set up even after updating a few things.
LikeLike
Stunning, completely stunning, i love this. You have done a remarkable job on this, you must be over the moon.
LikeLike
I must admit, it’s one of my favourite trees 🙂
LikeLike
Stunning work….my god, that is like a miracle. Its like the perfect specimin; great movement, age, stye. health. Wow, congratulations.
LikeLike
Thanks for your kind words James.
LikeLike
Time, good hands, good knowledge and vision make this work. Very good progress of the tree.
LikeLike
This is sheer brilliance, just like an ugly duckling turning into a swan.
LikeLike
Thanks for your kind words and taking the time to read and comment.
LikeLike
That is beautiful…. great imagination, really inspiring stuff
Great work bud
LikeLike
Thanks Adam, when are you coming up here for a closer look mate?
LikeLike
Well up for it man, have a wedding to my name in 5 weeks but after that will have to make the trip . Will pm you in wee trees.
LikeLike
You should come up for Peter Warren weekend in October. I’m sure I find find some one to put you up for a night.
LikeLike
Thank you so much for sharing this, I’m totally hooked now. Searching the garden for candidates….. then I can replace all the huge twisted dead roots and branches I keep cos they’re so lovely (to me!) with beautiful living bonsai. Well, if I live that long myself!
Congratulations on the escallonia, it’s truly beautiful, great job. Thanks again for sharing.
LikeLike
A most beautiful specimen. Truly a work of art to the highest standard for future generations to admire.
Can I ask, I bought an escallonia a few weeks back which although nursery stock shows potential but never owned one before not sure when is the best time to give it an initial styling?
I’ve got it in an oversized mica pot so shouldn’t need repotting next spring but other than that . . . .?
LikeLike
Hi Blair, they are pretty forgiving, but there are a few different types out there. If the tree has flushed out and hardened off then now is a good time to prune and style.
LikeLike
Hey any update on the tree this year?
LikeLike
I’ll have to update this page with more recent photos. The tree is now in a better smaller pot. If you use the search feature on my blog and search escallonia, I’m sure you’ll find some photos of it.
LikeLike
Amazing! I have been working with some dwarf escallonia and I love them but they are so rare in bonsai for some reason… I love them!
LikeLike