Shohin App for your Smartphone

If like me, you have a smart Phone, you have probably already carried out a search for bonsai related apps with no results. I don’t count that stupid game that’s there 😀

Well, good news! Morten Albek has created a Shohin App. It’s free and worth having as well. Below is a link to the relevant place for downloading.

Enjoy

Noelanders Trophy Winners

Here are the Winners from the 13th Noelanders Trophy.

The overall Winner is the beautiful Juniper Chinensis owned by Luis Vallejo

Simon Tremblett’s Willow won a nomination and was awarded a BCI President’s Award

Cascade Scots Pine owned by David Benavente, Nomination winner

Hornbeam EBA Award of Merit Winner, German Sojer

Nicola Crivelli’s Spruce, nomination winner.

Beech Raft nomination winner owned by David Barlow.

Best Kifu Chinese Juniper owned by Mauro Stemberger

Yew Owned again by Mauro Stemberger BCI Award

Best Tree entered by a member of BAB, Mugo Pine owned by Christian Vos

If I’ve missed any, let me know!!

Gallery

Noelanders Trophy Trees

This gallery contains 71 photos.

A big thank you to Harry from the Netherlands who follows this blog and has kindly sent me his photos from his visit to the Trophy yesterday. Here is a Gallery of his photos including some from the demonstration. Hope … Continue reading

Rate this:

Your Noelanders Fix

Just spent a good hour browsing  through what’s been uploaded from this years Noelanders Trophy.

Here are a few links well worth  looking at.

Jerry Norbury’s FlickR 

Jerry’s Norbury’s Video

Jerry’s Sales area video

Jeffery Van De Pol’s Album

IBC Thread

Awaiting the results with interest 🙂

Show Time

It feels like all the good shows are all happening now, and I’m missing it all 😦 I’m watching the Noelanders Trophy photos starting to drift onto the net and then I spotted this post on Tyler Sherrod’s Blog about preparation for Kokufu. I thought this photo of the truck loaded for transportation to the venue was brilliant. Click on the photo to see the trees on Tyler’s blog. Keep us posted Tyler 🙂

Left or Right?

I read a post on the Bonsai Tonight Blog a week ago that intrigued me. It looked at a particular tree and posed the question, What direction was the tree facing? This is important when displaying the tree and in some cases, having balance within the image.

Then a few days back Michael from the club posted this tree on his blog.

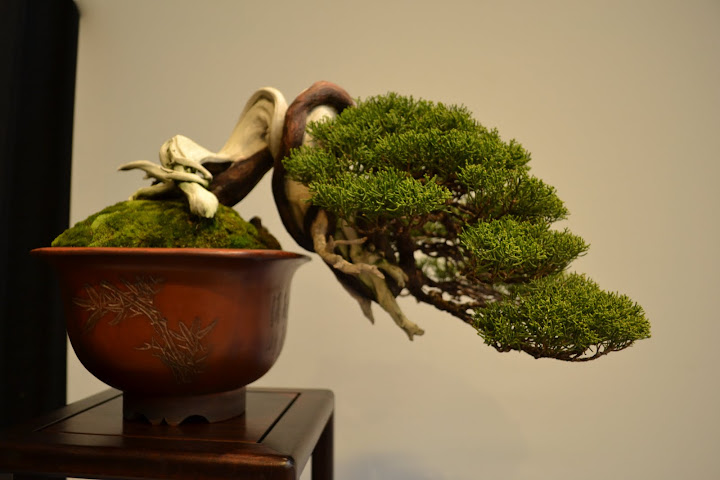
This tree poses that same question, is it moving to the left or right? It a Common Juniper that Michael is bringing over to my place next week for some work. I asked him if it was ok for me to share my views on it here as a learning exercise, for me, not Michael 🙂

To start with I just want to say that I rather like this tree and what it could become in the next few years. The two deadwood spikes pointing to the right, marked in red, give it real character and the larger one is nicely carved. It seems to have enough branching to create a nice image as well.

The bit I don’t like is the curve marked in white. This looks rather man made. Also the other branch marked in white is rather an odd angle but this should be fixable.

Now, if you look at the green triangle outlining the foliage mass, it currently points to the left. If you add the bend in the trunk and the lean of the apex, both marked in yellow, the the left looks quite strong.  However the deadwood all points to the right and does so very strongly.

I decided to do a few tilts to see how that changed things.

Here you can see the original angle in the middle and a tilt left and right either side. The one to the left just looks wrong. The one to the right however has possibilities. Below I removed the two jins just to prove a point that without them the tree is rather ordinary and lacks the original interest.

I opted to do two quick virtuals adding a little foliage and a pot. The first at it’s current potting angle and the second tilted to the right.

When I was done I wasn’t happy with the quality of the virtuals to be honest, but time has been against me. I would like to see a shorter tree with more definition within the foliage. This will be achieved when we actually get wire onto the tree. If I had to pick a favourite, it would be the tilted right one but I would want to try and disguise the bend a bit better. This could be done with foliage or even a continuation of the shari.

To be honest, I think that a change of front with a different viewing angle will make for a better tree. The bottom two branches can be moved into a better positions and more importantly, a new angle will alter the shape of that man made bend.

I’m pretty sure I’ve seen this tree in the flesh before. I’ve been to Michaels place a few times. For the life of me I can’t remember it!! I will however be looking forward to seeing it next week. I’ll keep you posted.

Thanks for letting me dissect your tree Michael. 🙂

Slab Larch Virtual

Following on from my last post about Roy’s Larch group and the comments made, here is a slab virtual that retains the rock element.

and with part of the rock removed for better lines.

The original pot virtual.

and the original

side by side…

Larch Forest Pot Virtual

Roy C brought this Larch forest to the club meeting on Friday. Roy has been creating bonsai for many years on his own, learning from books and his own experiences. About a year ago he heard about the NIBS and made contact through the Website. He has a bit of a drive to make it to the meetings but when he gets there, he always has something interesting to see.

This forest was created from young Larch seedlings that had self seeded into the guttering on a shed roof at his farm! When he put this group together, he added the white limestone as it reminded him of his local landscape. I quite like this sentimental idea but in it’s current form, the white rock over powers the image and the rocks are a little too angular.

We chatted about the group at the meeting and I made a few suggestions that in my opinion would make for a better image.

Firstly I felt that the stones should go. The rock to the left look as if they are holding the trees in the pot and are very distracting.

Secondly I felt that the height of the soil mass should then be reduced. It sits very high in the pot in its current design. This may be more sustainable in a wider pot.

Thirdly, a change to a larger, shallower oval pot would greatly improve the image. The current rectangle is too deep and inappropriate for a group.

Lastly, I felt that a few of the trees should have their height adjusted to give a more overall triangular over view. This could be enhanced by adding a further small tree or two at the edges.

I took a photo and said I would play about with a virtual to see if helped explain my views. Here is what I came up with.

A smaller tree could still be added to the right hand side during repotting. If Roy still wanted to include some white stone, a well weathered piece with a more worn appearance could be added in the space to the right as well. It would need to be low lying, mostly buried, just visible on the soil surface. Two trees to the right have been shortened as well.

With a few more years of ramification and a little wiring here and there, I think this will be a very nice little group indeed. Moss would be nice but the sparrows on the farm do major damage, but the less said about the sparrows and Roy, the better 😉

Phil’s Chamaecyparis Obtusa

Bar a few minor changes, that should be all the faffing about finished. Hope you like the different theme. I think it suits a photo based blog better.

To get the ball rolling again, here is a Chamaecyparis Obtusa that Phil collected from a garden a few days ago. I was at his place the other night and he insisted on getting the lamp out for a look in the dark. Plans are afoot to get it reduced in height and thinned out.

When he told me he had collected two Obtusa Chamae that where 6′ tall, I expected the inner branch structure to be bare. How wrong I was! Branches to the base on this one and foliage right to the trunk. Best of all, being a landscape gardener, he got paid for taking them out!! 🙂 The other one has been put in a flower bed for a year or so.

The faded original label was still attached. It states that its a Nana Gracilis. I always thought that this was the small variety and the label says a top height of 80 cm. At over twice that height, I think this may just be obtusa.

I love this variety for bonsai but have yet to find one worth keeping for myself. Phil has a decent start with this one, albeit limited style wise. If  he doesn’t want it, I’ll take it off his hands.

Here are a few that appeared on Facebook and other online sources. I have searched a few times to see what can be achieved with this species.

This one belongs to Josh, a fellow club member.

Storm Damage

On my walk this morning it was obvious that the high winds from a few weeks ago had taken their toll on this particular trail.

An old Hawthorn stump exhibiting some nice deadwood.

The trail ahead.