I decided to repot my little dwarf Willow. The training pot it was in was too big and also has a chip in it.

Out of the pot

and it’s new home. That’s better.


I decided to repot my little dwarf Willow. The training pot it was in was too big and also has a chip in it.
Out of the pot
and it’s new home. That’s better.
What else would you do on a Saturday night when the wives are at work 🙂 Phil and I got together to repot our jointly owned Elm Forest. The full history of this so far can be viewed HERE
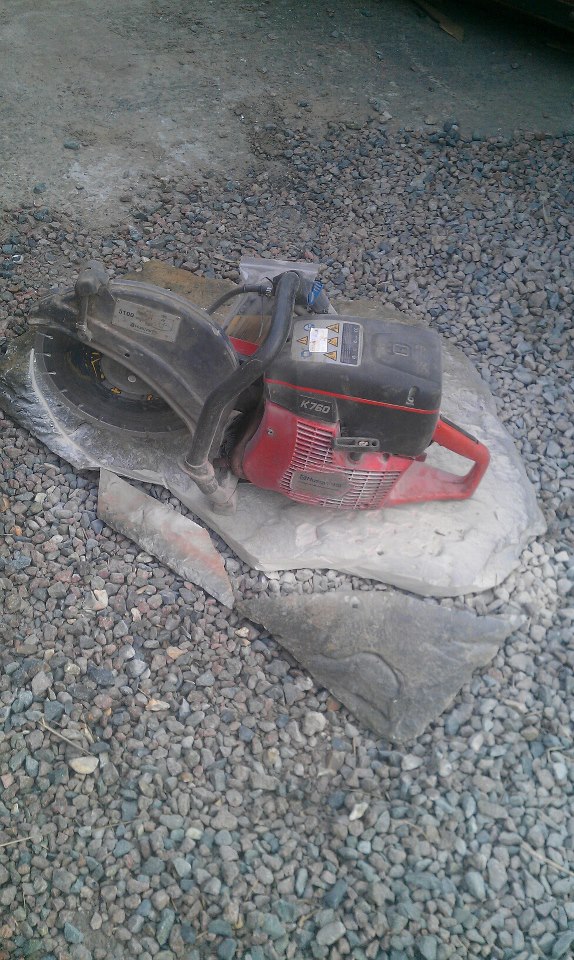
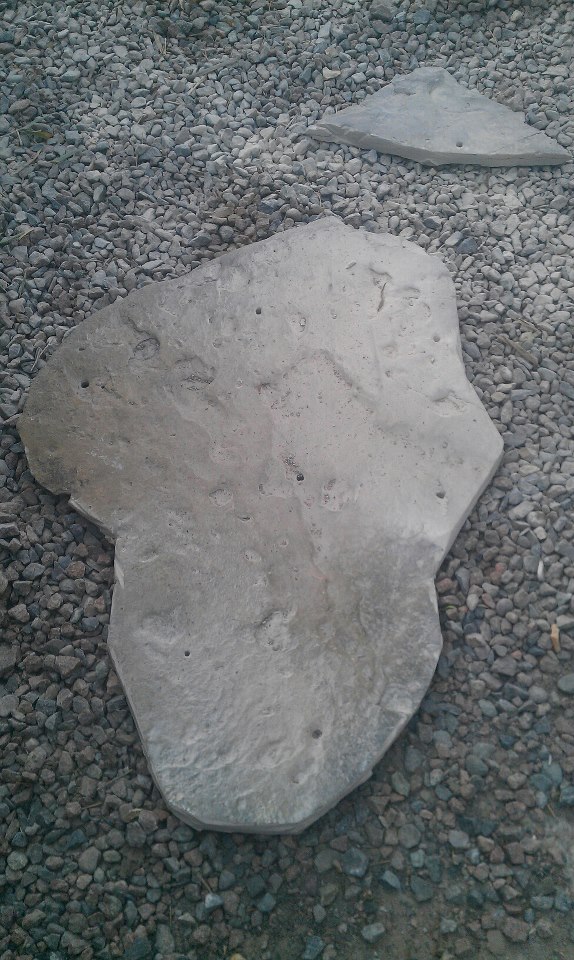
Not a pot as such, we have opted for a slab. This slab was kindly donated to me via Paul Bowerbank from the Swindon Bonsai Society. It was a bit of a struggle to get it to me! The postman would have had a hernia!! Paul knew I was attending the BSA 2012 Exhibition at Willowbog Bonsai and he bribed Bob Bailey to bring it up for me. They must be good friends, I would have refused 😀 Bob did me proud and I was able to collect it at Willowbog. This is the slab with the marking of where we felt the planting would be a best fit. We needed to reduce the overall size of the slab a little to allow for a better fit and also to be more manageable. Here you can see that Phil took a angle grinder to it to get the right shape. Its’s a total coincidence that it looks like the outline of Africa!

We set about preparing it for the elms to be transferred over to it.
Here is a gallery of our steps over the 3 hours required to get it completed.


It’s a two person lift nd will take up a lot of room in the garden, but it’s a great group to see in the flesh. Photo as usual, don’t do it justice. It will be a long time before this needs moved again. It is a vigorous grower and needs a lot of attention but that’s why it has developed so fast. Not bad for field grown cuttings started 12 years ago.
Last night saw about two inches of snow fall at my house and then just as quickly disappear again. I took these towards the beginning .
My accents burried

Larch

Pine

Hawthorn

Chamaecyparis

The garage / Workshop, lights on and ready for repotting action 🙂 more on that tomorrow.

Juniper


Birch

Beech

Grim

Cedar

Paul Bowerbank sent this altered virtual of the hawthorn in the previous post having removed the long branch to the right. I must admit I’m very tempted to do it right now 😀 It gets rid of a now very pronounced straight section. However, I will leave all alterations for a while giving myself time to make a few decisions. I will build most of the structure within this tree by clip and grow, only wiring when I absolutely must. Wired branches on hawthorn stand out a mile when you see their artificial bends during the Winter.


This twin trunk raft Hawthorn of mine has been a great tree to play with and learn from in recent years. Its a vigorous tree but by it’s very nature has been a problem for me to come up with a convincing design. As you can see from the photo, the two apexes are very close to the same height and also the raft/root portion of the tree is unconvincing as it rises out of the pot in places.
I discussed this tree with Peter Warren during a workshop last year and he suggested that the tree be tilted to the right to raise the left apex higher. This would also lower the other trunk line down to the soil surface closing the gap and make a more convincing design. I had already toyed with this idea during the previous repot but at that point it wasn’t possible due to the heavy root to the left. It would be raised out of the pot and would ruin the design. Peter said that this time around I might be able to reduce the root further back allowing for the change. This is the root in question.

This would be the new angle


I don’t have a suitable pot for the new position but I wanted to repot the tree and see if it was possible to carry out this alteration. If I was able to change the root now, I could pot the tree into a temporary training box and then keep an eye out for a suitable pot for a transfer next year.
When I took it out of the pot, it had done it’s usual thing, and had circled the pot with roots.

I removed all the long roots and had a close look at the problem heavy root. By working back step by step I was able to removed sufficient root to allow me to make the new angle. Here you can see how much was removed.
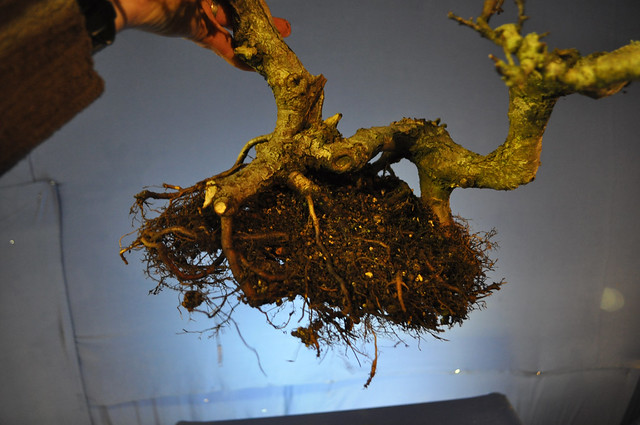
Happy to remove this heavy bit considering the strength of the tree.

This was what was circling the pot!

This is the tree potted in a training box at it’s new angle. See the change in the apex heights and also how much more convincing the surface roots are. I might tilt a little further yet but for now I’m happy until I can find a suitable pot.

I’m sure someone out there now is saying ‘Shell Pot’ 🙂 I’m not a lover of the shell but this might be nice. This is a virtual I made after PW ‘s visit. And this angle would definitely be achievable now.

The pot that I swapped with Stephen a week ago has now found a new tenant. I really wanted to get a tree into it this year just so I could look at the pot on the benches 🙂 I survey of trees brought me to this root over rock Cotoneaster. It’s current matt brown pot isn’t lifting the tree in any way. I wanted something that would help show off the flowers, berries and amazing Autumn colour. This pot might not be ideal, but it close for me. The size was just slightly larger than the old pot and I was able to lean the tree slightly to the right to make the image more dynamic and bring the heavy root to the left more into play.
This was it in the Autumn, so you can see why I wanted to lift the colour of the pot to compliment the foliage.

and before potting

and after in the new pot at a new angle.

This is Ian B’s little shohin Kyiohime maple after a repot. It was in dire need of repotting and the roots proved problematic. The pot Ian had purchased for this proved to be too risky to achieve in one step. This was my fault, not his, as I had picked the pot. It is now in this nice little blue one, a Lark Lane pot if anyone remembers them. I have a real soft spot for them.

Stephen asked if I’d give him a hand repotting his Hornbeam. It’s a big tree and he’s only a hobbit sized fellow. 🙂 I wanted a hand with my big pine as well, so we opted for a potting session on Saturday afternoon.
This is the hornbeam

It has an impressive buttress, but that has been part of the problem with this tree.

The heavy roots also translate into heavy roots underneath. The problem now is getting the tree into a more suitable pot. Any of the right depth are unsuitable as the tree sits solidly on a heavy wood base. Stephen attempted to pot this tree last year but the pot he picked was a non-starter as it was too shallow. This is the offending base root/s.


This time around we took our time and slowly removed some of the wood to allow it to fit a shallower pot. Stephen had purchased a Wallsall Ceramic pot for this back in the Autumn, and even though it was deeper than the previous new pot, the tree was still was too high when placed in the pot. By removing the wood as seen below we hoped that would be resolved.

Stephen prepares the new pot.


And this is the tree repotted. Now, what’s the best front?! This is the front I prefer. The root spread is impressive and all chop mark deadwood areas are hidden at the back.

This is the other side. Still really nice and some would say that the wounds are more like uro’s and are worth showing off. The nebari is probably slightly better from here as well. Which is your favourite?

This is back to my front and with some slight pruning towards the apex as the buds where too strong in this area.

Nebari


It was fun watching Stephen trying to get it back in the car 🙂


See it even fits in a hobbit car!!

Popped into the Bonsai Baker’s place during last week. Had a good look about and chatted about trees as usual.
A head scratcher 🙂

His Kyio-hime Maple bursting out

His big Hornbeam that we repotted on Saturday afternoon. More on this soon.

Buds on Hornbeam swelling nicely

His clump Maple


A Cotoneaster potted into a training box to boost growth.

A lovely little pot that Stephen had. A lovely purple colour running through the glaze, photo doesn’t capture it well sadly.

Some of his Accent pots.

Stephen had used one of my pots recently for his maple and I was admiring a pot on his shelf. We ended up swapping. I have no clue what I’m putting in it, but who cares, I love it.


Shop for quality bonsai
bonsai and garden
The Kaizen Bonsai Blog
Teaching, Learning, Enjoying Bonsai
The ramblings of an old artist and someone who would like to grow better bonsais trees
my bonsai
My wood creations
Hand Crafted Furniture
Creativity Through Bonsai
dirt leaves flowers
bonsaï | vidéo | Japon - ActuBonsaï
Japan's aesthetic, craftsmanship and spirit
Bonsai with a hint of madness...
"Tibolar-RS. your soil needs it, your plants will love it"
