
…I hope.
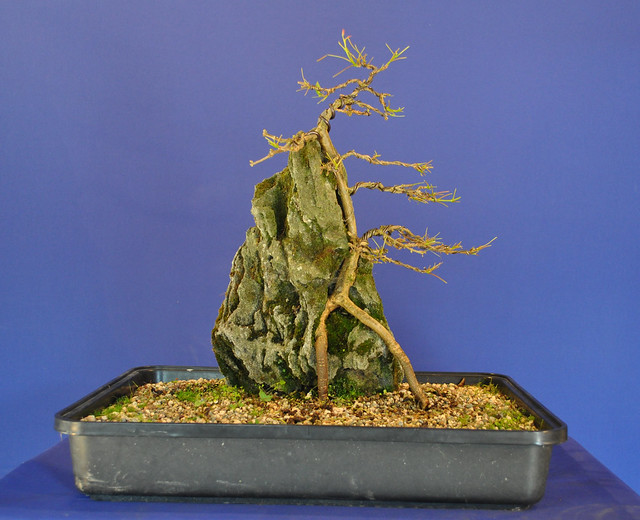
Continuing my manoeuvring to keep my son on the bonsai bandwagon, I spent an hour or so this afternoon working on a tree. When my friend Stephen donated a few of his to the cause, I asked Matthew which ones he liked. He was drawn to this Root over Rock Trident. ( Not really a root over rock, more like a growing against a rock Trident.)
 It’s well hardened off already and has extension growth on most branches. I decided to allow Matthew to defoliate it to begin with. Bit early, I hear you say! You might be right, but I find Tridents so strong and vigorous that two defoliations in the year isn’t a problem. I set him to work.
 Blissfully unaware of my camera work, you can almost hear the concentration from here.
After defoliation we wired a few branches into place for practice and discussed the shape that the tree will take in future.
 I talked about extending the foliage pads on the right, and keeping the left hand side tight to show off the rock and give the tree more interest. I then explained how, in a different pot, some negative space on the right would really help the overall image. I spotted an old Mica landscape pot under a bench and decided to show him what I meant. The pot was big enough to allow me to lift the planting out of the training pot and into the mica one without removing any root.
 I told him that he needs to find a similar looking bit of rock or a big lump of moss to fill the gap between rock and root at the base.
I didn’t set out to do all this today, I think we got carried away!! I am confident that this tree will bounce back in a few weeks. I’ll even post an update here to prove it 🙂

 I decided to heat the jin with a blow torch and bend it into a more complimentary position. I protected the foliage with tin foil while I heated the jin. I used jin pliers to hold and twist the wood as I heated it. Once I got it to the right spot I held it for a minute or so for it to cool down and set in it’s new position.
 As you can see, the heating treatment allows for decent bends to be added and has the benefit of ageing the wood with fire.
 After a quick coat of Lime Sulphur I applied self Amalgamating Tape to the upper trunk area to protect it while I applied a bend or two. The upper trunk was bolt straight and I wanted to bring the foliage in tighter to the main body of the tree.
 This is it after bending and some basic branch placement. It isn’t very refined as the foliage quite heavy and I wasn’t prepared to pinch it back any harder at this point. I reduced the jins at the base as they distracted from the rest of the tree. These will also be refined further at a later point as they are a bit clunky as they sit now. Further growth will be needed to fill out the image but the basic structure I wanted it there now.


 I gave it a weeding and trim. A few branches got a light wiring to place them in the right position. If it continues to grow like this it’ll fill out before the end of the year!! Here’s the result of yesterdays work.


 This is a bud before pinching out the centre. A few have what look like flowers appearing. I’ll have to wait and see.
 Evidence of pinching on the bench.
 This is some of the back budding close to the tips. However major pruning is producing adventurous buds on old wood so this might be removed altogether to help fill inner branches with buds.


 These are what I’m removing. Some have already dropped the flower petals leaving the seed heads.
 and this is it 45 minutes later.
 this is under the bench!
 I have given the tree it’s first feed and a good watering in.
 It had fully opened since then but I wasn’t happy with the length of some of the internal branches. I want to build up a fine ramification and some of these are too long and straggly. I decided I needed to take it back in quite hard to eliminate the strait bits and force some back budding. This is it today.


