I plan on looking back at a few of the trees worked on over the weekend, as does Peter on Willowbog Chat. As Peter didn’t get a chance to work on this one, I thought it was safe to share.
This was a beech group that Ben had in a pot for 4 years. They are young trees but even still they can make a nice image. Ben had brought the group to a meeting and I suggested that they would look better on a slate. It just so happened I had one lying under a bench that was big enough, and gave it to Ben. I also suggested that a few thicker trees would greatly improve the image as well.
Ben took me at my word and brought it along on the Sunday along with a few Beech that were recently liberated from a garden.
If it was just a matter of lifting the existing planting out of the pot and popping it onto the slate, it would have been easy. No tie wires even needed as the trees were all meshed together after a few years in a pot already. Our problem was that a few new and bigger ones had to be added. I had 2 choices, split the whole group up and start again or fit the new ones in around the existing trees. I opted for a bit of both. I liked the positioning of the original trees but I split the group in two creating a gap for the new ones. I drilled the slate and wired these in place and also added a few tie lines for the original trees as well. The whole lot where then covered in keto and then moss.
Ben was pleased with the result and I feel the slate works far better than the pot in this sort of forest planting. Now he just has to keep the birds away from the moss 🙂
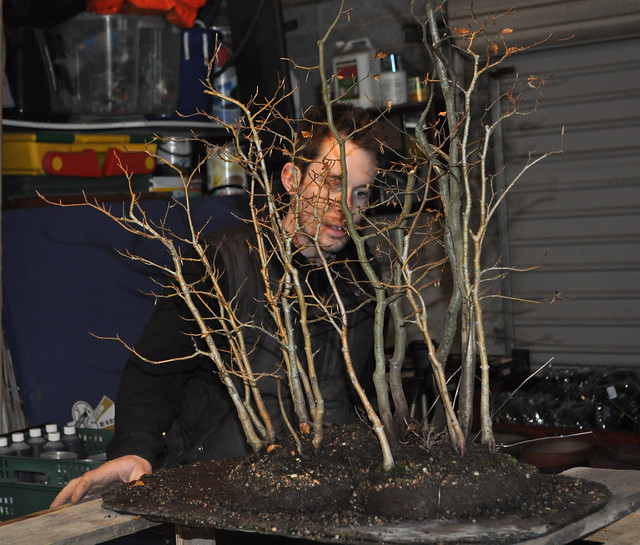
Here are a few photos of the action. Sorry no starting shot of the original group. I honestly thought I had one somewhere from the meeting Ben, ah well.
Ben me and Ovidiu doing a little manoeuvring.

My secret technique of using the force to position the trees 🙂

Ben checking that the work is up to standard.
Adjusting the heights of a few trees to make a better design.

The finished forest at the end of the day. The new trees are slightly darker bark for now but this will even out with equal exposure to the sun.


Ben emailed these photos taken in 2007 when he put the original group together. I believe it was his first attempt at a forest.


 Dead leaves removed. I don’t want any hiding places for little beasties over the Winter.
 The original chop will need some carving work to look more convincing.
 This Wild Pear was also put away. I will be leaving the branches to extend further next year to thicken before cutting back next Autumn.
 Bench cleared ready for destruction!

 Now the problem is the overly tall Hawthorn hedge to the back of the garden. This will shade out a lot of the tunnel.

 The frame of the tunnel was put together yesterday by my son and I. Pretty straight forward and the heavier frame on the Pro version seems to be worth a little extra.
 3m x 2m x 2m.
 A quick lift over the fence into it’s new home. I haven’t made my mind up what angle to place it at as yet. The wind was strong yesterday so I wasn’t going to chance putting on the cover. That is a job for today.

 This is probably closer to the final potting angle.
 I know it doesn’t look like it, but there is some pretty good movement in the trunk line of this tree.
  This was it after removing the unwanted branches. I left the low branch on, I think this might make a nice feature.
 This is the stump for carving. By the feel of the pot and how steady the tree is, I think there is sufficient roots for this work to be carried out during the Winter.
 Considering I was going to just chop this off and bin it, I’m glad I waited for an Air Layer. I have another big Hawthorn that I now plan to layer next Spring.
 Most of the branches produced this year are now too thick and stiff to position with wire into a desirable shape. Others are in the wrong place. These, for example, are growing from the inside of a bend.
 I quite liked this as a possible new front.
 I removed the unwanted branches and left those that can still be of use in the design of the tree next year. The area where the air layer had been removed will need carving. It takes away from what is actually nice movement in the tree. Also, some deadwood at the base where old roots had been torn at some point in the trees past.

 Now that the tree has become better established in it’s new pot, next year I will direct any new shoots early while they are still flexible. I hope to see plenty of adventurous buds appearing in the Spring.


 This is the back of the tree. The deadwood needs a lot of refining here to improve a very flat boring area. However there is one branch at the back that isn’t connected to the main vein and I wanted to avoid working in this area. To be honest it’s hard to tell where the live vein is for this branch. It may have a slight crossover from the front. Any way, no rush. Tree will be left now for the rest of the year to get used to my garden and my care.

 I’ll keep you posted with details on how the Autumn colour turns out this year and if it has any affect on the flowering next Spring.