Stephen’s Larch Restyle

After getting my own larch sorted out, attention turned to Stephen’s one.

This is it sitting at Stephen’s house. When we worked it out, it hasn’t been wired in 8 years. The last styling was done by Marco Invernizzi back in 2004.

Photos from then can be viewed here.

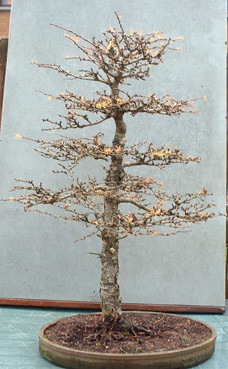
It’s a big tree and we wanted to try and complete the wiring in one day. Phil collected the tree in his van and we transported it to my garage for a little space to work in. Stephen’s bonsai studio was only build for hobbits and I’m definitely not that size 🙂 This it is photographed before we started.

About now you are probably having a close look at the base of the tree. Yes, it’s a strange one, it’s hard to see but there is a strong root that runs directly under the trunk lying parallel to the ground. This will be exposed to help show stability. There is another option, but that’s for another day!

The three of us got to work and managed to get the wiring completed.

One area that was a problem was the apex. It had been created from a single branch curled around to make it look fuller at the time. 8 years on this has become a problem. It could have been hidden by placing branches over the offending bits but could not be removed totally and make a convincing apex. We discussed it and Phil was keen to make a change rather that it becoming progressively worse with time. He came up with an option and Stephen decided to go for it.

This is the offending apex.

Branch being reduced.

Keep an eye on him Stephen 🙂

A typical Stephen Coffee break.

Birds eye view.

Final tweaks

The final image. Stephen is considering a change to the top jin, what do you think? Remove, leave, shorten?

The new apex looks a great improvement.

A closer look at the base.

Side view

Back

Before and after side by side.

The 3 amigos for scale, and just for fun.

We did this work without looking back to Marco’s styling in 2004. It was interesting to compare now having looked for the original photo.

Tall Larch Restyling

I eventually got around to wiring up this larch yesterday. This is it before work.

This tree has fantastic old bark, as good as I’ve seen on a larch. It originated in Scotland and I’ve had it in my collection for many years. It’s not a WOW! tree by any means but I do like the formal image that can be produced from it. It got a year of little or no pruning to allow me to have some extra length to the branches that I could play with to increase the amount of different levels I could create.

In the 18 years that I’ve been playing with bonsai I have been using aluminium wire. This year I’ve gathered up enough copper to give it a go on my conifers. Yesterdays wiring saw me using only copper wire.

The final image saw me adjust the front slightly to the right.

For scale, I added myself to the image.

Side by side

Back in 2002

The bark

2003

Spring 2012

Other images here

Winter Walk

Last Sunday I walked a bit of the County Down coastline with Stephen and Philip. WE could hardly call it walking in a Winter Wonderland but it was pleasant al the same. Trees, birds, water, dogs, wind! take your pick. Notice a confused gorse bush in flower!


Disappearing Bit by Bit

This old tree is a bit of a landmark if you live in Bangor County Down. It can be seen from the road when travelling from Bangor to Holywood. It’s in a now famous field as Rihanna cavorted around in it during the Summer and got told off by a local farmer 🙂

Michael over on his futterwithtrees blog photographed it back in December 2011 but as you can see, recent storms have reduced the tree even further.

This is Michaels shot last year

and mine from last weekend

Cork Bark Elm Winter Image

Grown from a cutting, starting to look the part.

Larch Group For Sale

I brought this Group of 3 larch in for a trim back yesterday. I had planned to split the group perhaps create a bigger scene, but trying to source extra trees with the same quality of bark and ramification has proved a chore. I have therefore decided to sell the group over the next few months. I have had my fun with it but want to give my time to other trees and projects. The 3 larch all came from the wild in Scotland and have great quality bark. The rock element in this landscape was collected from Lough Corrib and has great character. The pot is Walsall Ceramics.

Before trim

This was it with Autumn colour last Autumn.

Last Winter

DSCF3192

Back in 1997 when I first put it together.

larch group 1997

Back in 2000 when I tried it on slate for a while.

Larch group 2000

Close up of the Corrib Rock element.

close up3

If anyone is interested in buying this, just drop me an email bonsaieejit@gmail.com.

Winter Protection

I held off as long as I could, but over the last few days have popped most of my trees into cover for the Winter.

Empty Display Benches

This is where everything is hiding.


Last Year’s Noelanders Trophy

Mr Snart posted a few past trees from the Noelanders Trophy on his blog yesterday and I again found myself drooling and wishing I was able to attend in 2013. Sadly, that’s not an option for me.

Last year Harry, my reliable Dutch photographer, sent me his photos from the Trophy, I thought it would be nice to share these again as a taster of what we can expect to see in January. Hopefully Harry is going again 🙂


Trim and Tuck

Yesterday I did a little trimming back of Summer extension growth on a few deciduous trees before tucking them away in the green house for Winter.

I’m trying to increase the overall outline of this Trident maple and have therefore allowed for more extension than normal to remain.

Escallonia Step by Step

I did a little more work on the Escallonia in November.

Peter Warren had suggested back in October that I remove a front branch. I did this and now this stump needed added to the deadwood on the tree.

When Mr Snart was here a few weeks back we had a look at it. Peter has excellent carving skills and I wanted his advice about opening up the trunk to allow me to reach the hollow centre. It had rotted at the base and was hollow inside, but I couldn’t reach this area to add wood hardener. Peter kindly offered to do a little carving on the tree to add the extra deadwood at the front and also open up the trunk to allow me to gain access.

This was the tree before removal of the front branch.

https://i0.wp.com/farm8.staticflickr.com/7266/8151051685_423bac58cc_z.jpg

and after branch removal

https://i0.wp.com/farm9.staticflickr.com/8195/8094126171_072c2b1c73_z.jpg

Here is Peter doing a little carving.

https://i0.wp.com/farm9.staticflickr.com/8482/8237889736_beea6cfd7d_z.jpg

https://i0.wp.com/farm9.staticflickr.com/8062/8236821683_97362f3f0b_z.jpg

On Friday I spent a little time washing out the remains of the sawdust and rotted wood. I did a little more carving and cleaning of the original deadwood to remove some algae. As you can see below there are now 3 opening added by Peter into the centre of the trunk that I can now access and apply hardener. The opening are small visually but allow room for a toothbrush to enter. The remaining heartwood is all solid and rotting seemed to have been limited.

https://i0.wp.com/farm9.staticflickr.com/8484/8234671177_34eb6cb823_z.jpg

https://i0.wp.com/farm9.staticflickr.com/8068/8234671959_8d21a0bf83_z.jpg

https://i0.wp.com/farm9.staticflickr.com/8069/8235736540_eff0c85af5_z.jpg

I plan to treat the wood this week and apply a fresh coat of lime sulphur to the outside, perhaps darkened down a tad. I’ll keep you posted.