Michael’s Repots

Michael brought along a few trees on Saturday to repot and a bag of biscuits too, top bloke 🙂

This little Japanese White Pine was over due a repot and was growing in very compacted akadama. It got a new pot that was a more suitable colour than the original cream one. Original post about this tree HERE

This Cedar also got a repot.

The jin in the middle of the shari is an add on but very well done.

Last up from Michael was this Scots Pine.

A productive afternoon.


You will Never Walk Alone

They’re winning, we’re winning, they’re winning, we’re winning, we won 🙂 Nerves are wrecked!!

Today’s Dander

This morning we walked from Ballyholme in Bangor to Orlock Point. This is the next part of the coast line past were we normally walk. Here’s a map.

Compared to the Baltic weather experienced in my garage last weekend, today was actually very mild indeed.

Plenty of flowers appearing early

Groomsport

Lookout at Orlock

Ivy creeping up a rock face

Dry stone wall

My two dogs making some pigeons take to the wing 🙂

Stephen finds something to photograph

I follow suit

The finish line

My two older brothers lagging behind 😉

Stephen’s Raulii Repot

Stephen repotted his Raulii at my place yesterday. It was in a very shallow training pot and he brought along two pot options and we opted for the oval cream pot.

This was it before the start of the work. There was two possible fronts, this one with this nebari.

and this one which we finally opted for.

The root mass was shallow but was solid fine roots with no heavy stubs to be pruned. The previous owner had done a great job in the development.

Stephen taking a few record shots with his camera. Maybe he’ll actually get around to posting them on his own blog 😉

Washing out the roots to get rid of some old compacted garden soil.

an even bigger nebari is uncovered and was the reason for picking this as the front.

It’s new home.

The tree potted up.

Root Over Rock Trident Repot

I had hoped to repot this last Sunday but ran out of time. A week later it has opened further and I had to get it done today. Stephen and Michael came over to my place and did a little repotting of their own. Stephen was able to help me man handle the Trident as the rock made it rather hard to work with.

This was it before we started.

As you can see the rock over hangs the pot and I wanted to incorporate the rock within the pot this time around. I bought a nice Walsall Ceramic pot for it last week from Willowbog Bonsai.

When I removed the Tree from the pot I was able to see how it had been wired in last time. I decided that I was probably best to follow a similar process this time too.

I pulled out two wedges from the mix that had been used to get the tree sitting at the right angle and position.

This is it after root pruning and washing out.

I prepared the new pot with wooden supports for the tree and to aid the tying in of the tree.

Once we got it potted up, it got a good watering in. The mix is akadama and kyodama.

This is the final image. I much prefer the new look and am delighted with the pot too. It’s at a slighted different angle and rotation in the pot.

Side by side before and after.

Frankie’s Hornbeam

I may refer to this as Phil’s Hornbeam but it is actually his Dad Frankie’s tree. It was brought down to my place for the Sunday workshop at great risk to Phil and the back of my car! I have that much grit in the boot, I could pot trees directly into it!!

This was it before thinning out by Peter.

Phil for scale

As you can see, it’s a beast of a tree and is a nice image in itself, especially when in leaf. [the leaves hide the stumps] It was field grown and was lifted about 3 years ago when it was cut back hard. The finer growth has been trimmed a few times in the last few years but many of the big stumps are still there needing work. Enter Mr Snart onto the scene on Sunday.

We discussed the tree and what needed done to create a decent image. Not for the best look now but for the best possible potential down the road. Peter carved and cut his way up the tree removing all the stumps and branches that were going to be unsuitable in the final design. This allows the tree to grow now in the right places instead of wasting energy on growth that will ultimately be removed.

This is the tree after the workshop back to bare bones but has taken a big step in it’s future design.

Swindon Show Videos

If like me you missed a walk around the show, this might help ease the pain 🙂

Spawn!

I would have thought it was still a little early for frog spawn but in the last few days I have heard two different people mention seeing it. My brother spotted some in a pond on Saturday and Hugh from the club photographed this in his pond.

Is Spring really here.

Twosome

Threesome

Orgy !

Ben’s Beech Group

I plan on looking back at a few of the trees worked on over the weekend, as does Peter on Willowbog Chat. As Peter didn’t get a chance to work on this one, I thought it was safe to share.

This was a beech group that Ben had in a pot for 4 years. They are young trees but even still they can make a nice image. Ben had brought the group to a meeting and I suggested that they would look better on a slate. It just so happened I had one lying under a bench that was big enough, and gave it to Ben. I also suggested that a few thicker trees would greatly improve the image as well.

Ben took me at my word and brought it along on the Sunday along with a few Beech that were recently liberated from a garden.

If it was just a matter of lifting the existing planting out of the pot and popping it onto the slate, it would have been easy. No tie wires even needed as the trees were all meshed together after a few years in a pot already. Our problem was that a few new and bigger ones had to be added. I had 2 choices, split the whole group up and start again or fit the new ones in around the existing trees. I opted for a bit of both. I liked the positioning of the original trees but I split the group in two creating a gap for the new ones. I drilled the slate and wired these in place and also added a few tie lines for the original trees as well. The whole lot where then covered in keto and then moss.

Ben was pleased with the result and I feel the slate works far better than the pot in this sort of forest planting. Now he just has to keep the birds away from the moss 🙂

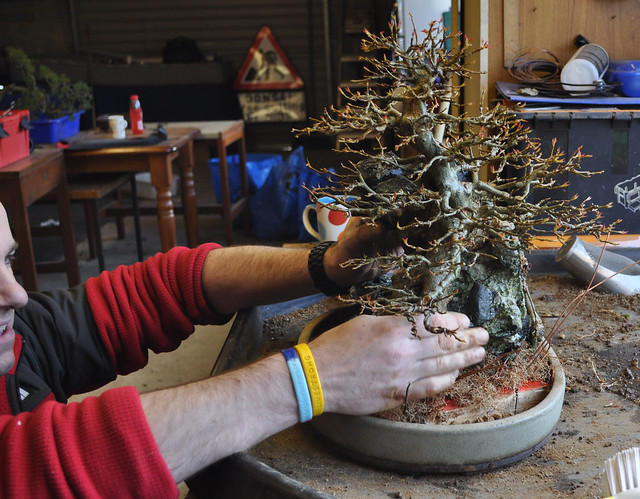
Here are a few photos of the action. Sorry no starting shot of the original group. I honestly thought I had one somewhere from the meeting Ben, ah well.

Ben me and Ovidiu doing a little manoeuvring.

My secret technique of using the force to position the trees 🙂

Ben checking that the work is up to standard.

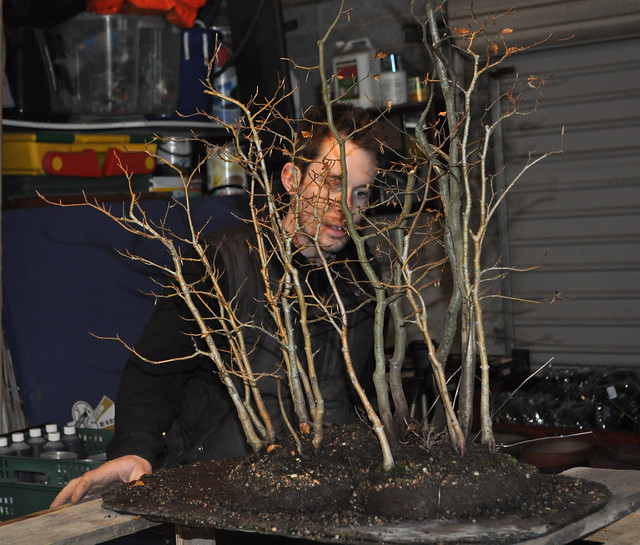
Adjusting the heights of a few trees to make a better design.

The finished forest at the end of the day. The new trees are slightly darker bark for now but this will even out with equal exposure to the sun.

Ben emailed these photos taken in 2007 when he put the original group together. I believe it was his first attempt at a forest.

Bonsai Mirai

Tony posted this on his blog and I just had to share it too. It’s video featuring Ryan Neil’s ‘Bonsai Mirai’ Nursery. A truly fantastic video, quality production and some absolutely stunning Bonsai. If this is what’s to come out of the USA in the coming years, we are in for a real treat. Yamadori to die for!! I’ve watched it 5 times!