Hawthorn Layer Potting On

I have just repotted my Hawthorn Air layer for the first time. The full story up until now can be read and seen HERE.

It was originally layered back in 2010 and it was now time to repot to enable me to removed the sphagnum moss that had been left intact so that the new roots wouldn’t be disturbed.

Before repot.

Plenty of root to work with

Buds swelling fast, a good time to repot.

Removal of the old stump below the layer point

Getting rid of the old sphagnum moss that will hold way too much water and will cause problems in the roots if left.

Potted up. It will get a full year and then some styling decisions will be made next year.

Another angle to show movement.

Mini Salix

I decided to repot my little dwarf Willow. The training pot it was in was too big and also has a chip in it.

Out of the pot

and it’s new home. That’s better.

Elm Forest Update

What else would you do on a Saturday night when the wives are at work 🙂 Phil and I got together to repot our jointly owned Elm Forest. The full history of this so far can be viewed HERE

Not a pot as such, we have opted for a slab. This slab was kindly donated to me via Paul Bowerbank from the Swindon Bonsai Society. It was a bit of a struggle to get it to me! The postman would have had a hernia!! Paul knew I was attending the BSA 2012 Exhibition at Willowbog Bonsai and he bribed Bob Bailey to bring it up for me. They must be good friends, I would have refused 😀 Bob did me proud and I was able to collect it at Willowbog. This is the slab with the marking of where we felt the planting would be a best fit. We needed to reduce the overall size of the slab a little to allow for a better fit and also to be more manageable. Here you can see that Phil took a angle grinder to it to get the right shape. Its’s a total coincidence that it looks like the outline of Africa!

559945_551268754907869_1398942315_n

374374_551268478241230_1404191498_n

541601_551269638241114_742318990_n

We set about preparing it for the elms to be transferred over to it.

Here is a gallery of our steps over the 3 hours required to get it completed.

It’s a two person lift nd will take up a lot of room in the garden, but it’s a great group to see in the flesh. Photo as usual, don’t do it justice. It will be a long time before this needs moved again. It is a vigorous grower and needs a lot of attention but that’s why it has developed so fast. Not bad for field grown cuttings started 12 years ago.

Tale of Two Apices [Apexes]

This twin trunk raft Hawthorn of mine has been a great tree to play with and learn from in recent years. Its a vigorous tree but by it’s very nature has been a problem for me to come up with a convincing design. As you can see from the photo, the two apexes are very close to the same height and also the raft/root portion of the tree  is unconvincing as it rises out of the pot in places.

I discussed this tree with Peter Warren during a workshop last year and he suggested that the tree be tilted to the right to raise the left apex higher. This would also lower the other trunk line down to the soil surface closing the gap and make a more convincing design. I had already toyed with this idea during the previous repot but at that point it wasn’t possible due to the heavy root to the left. It would be raised out of the pot and would ruin the design. Peter said that this time around I might be able to reduce the root further back allowing for the change. This is the root in question.

This would be the new angle

I don’t have a suitable pot for the new position but I wanted to repot the tree and see if it was possible to carry out this alteration. If I was able to change the root now, I could pot the tree into a temporary training box and then keep an eye out for a suitable pot for a transfer next year.

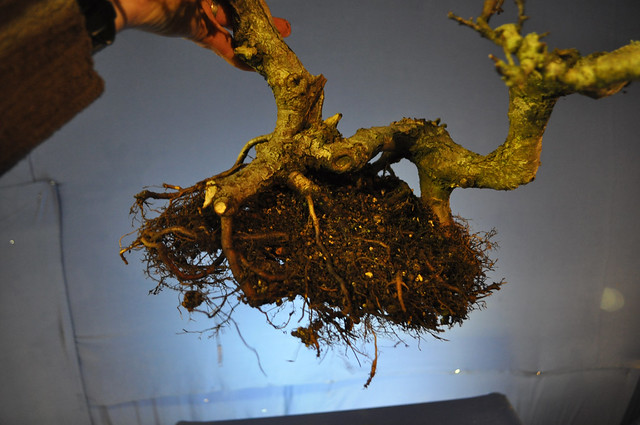
When I took it out of the pot, it had done it’s usual thing, and had circled the pot with roots.

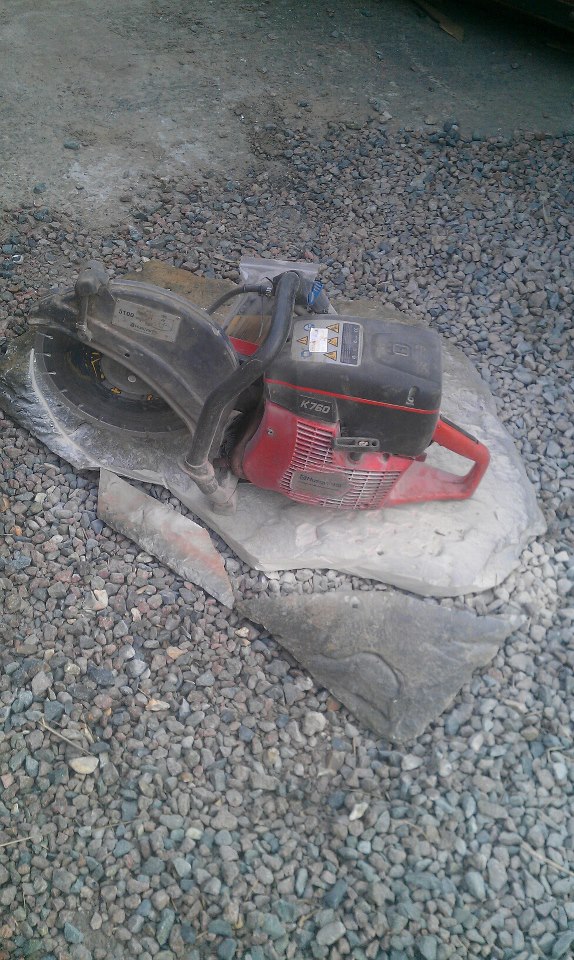
I removed all the long roots and had a close look at the problem heavy root. By working back step by step I was able to removed sufficient root to allow me to make the new angle. Here you can see how much was removed.

Happy to remove this heavy bit considering the strength of the tree.

This was what was circling the pot!

This is the tree potted in a training box at it’s new angle. See the change in the apex heights and also how much more convincing the surface roots are. I might tilt a little further yet but for now I’m happy until I can find a suitable pot.

I’m sure someone out there now is saying ‘Shell Pot’ 🙂 I’m not a lover of the shell but this might be nice. This is a virtual I made after PW ‘s visit. And this angle would definitely be achievable now.


That Pot

The pot that I swapped with Stephen a week ago has now found a new tenant. I really wanted to get a tree into it this year just so I could look at the pot on the benches 🙂 I survey of trees brought me to this root over rock Cotoneaster. It’s current matt brown pot isn’t lifting the tree in any way. I wanted something that would help show off the flowers, berries and amazing Autumn colour. This pot might not be ideal, but it close for me. The size was just slightly larger than the old pot and I was able to lean the tree slightly to the right to make the image more dynamic and bring the heavy root to the left more into play.

This was it in the Autumn, so you can see why I wanted to lift the colour of the pot to compliment the foliage.

and before potting

and after in the new pot at a new angle.


Ian B’s Kyiohime Maple Repot

This is Ian B’s little shohin Kyiohime maple after a repot. It was in dire need of repotting and the roots proved problematic. The pot Ian had purchased for this proved to be too risky to achieve in one step. This was my fault, not his, as I had picked the pot. It is now in this nice little blue one, a Lark Lane pot if anyone remembers them. I have a real soft spot for them.

Stephen’s Hornbeam Repot

Stephen asked if I’d give him a hand repotting his Hornbeam. It’s a big tree and he’s only a hobbit sized fellow. 🙂 I wanted a hand with my big pine as well, so we opted for a potting session on Saturday afternoon.

This is the hornbeam

It has an impressive buttress, but that has been part of the problem with this tree.

The heavy roots also translate into heavy roots underneath. The problem now is getting the tree into a more suitable pot. Any of the right depth are unsuitable as the tree sits solidly on a heavy wood base. Stephen attempted to pot this tree last year but the pot he picked was a non-starter as it was too shallow. This is the offending base root/s.

This time around we took our time and slowly removed some of the wood to allow it to fit a shallower pot. Stephen had purchased a Wallsall Ceramic pot for this back in the Autumn, and even though it was deeper than the previous new pot, the tree was still was too high when placed in the pot. By removing the wood as seen below we hoped that would be resolved.

Stephen prepares the new pot.

And this is the tree repotted. Now, what’s the best front?! This is the front I prefer. The root spread is impressive and all chop mark deadwood areas are hidden at the back.

This is the other side. Still really nice and some would say that the wounds are more like uro’s and are worth showing off. The nebari is probably slightly better from here as well. Which is your favourite?

This is back to my front and with some slight pruning towards the apex as the buds where too strong in this area.

Nebari

It was fun watching Stephen trying to get it back in the car 🙂

See it even fits in a hobbit car!!

Twin Trunk Scottie Repot

It was time to repot my Scot’s Pine from my Ryan Neil workshop. I needed to get it into something better than the plastic container that had been substituted after the tree blew off the bench a while back and smashed a rather nice Iain Baillie pot 😦 I had looked for a pot while at Willowbog but there wasn’t a pot that met all the needs. I opted to buy a temporary pot that would do for the next few years and allow me to look around for the right final pot.

The observant of you will notice that the tree still needs to tilt slightly further to the right. I need to make a further slight adjustment but this is mostly down to the wrong angle from which I took the photo!

Ben’s Maple Repot

After we potted up the collected trees last weekend, I gave Ben a hand repotting his Maple. The pot didn’t really do anything for the tree and Peter Snart had suggested removing a branch to the right side that was always going to look plain ugly. It looks ok in the photo, but trust me, it had to go! It’s not a typical maple, with a hollow trunk and the variety is known to produce a larger leaf. That said, Ben has done a great job of reducing the leaf size and also the inter-nodal length.

The old look

The new look. The little branch to the right will be grown out to add some balance after the removal of the ugly branch.

Proof of Life #3

By now you are thinking that I actually have no bonsai of my own and my garden is full of other peoples trees! You might be right!!

This one is for Valerie. Her Arakawa Maple was in desperate need of major pruning and a major repot at the Willowbog workshop back in May. As the tree was already in full leaf, we opted to defoliate, prune and repot all in one go. I decided to keep it for the Summer for some special aftercare. This is it now. I think you should be happy with this Valerie 🙂